Merlin ToolChain manual
V.1.0
15/11/2007
Contents
This
document contains instructions on how to operate the ToolChain plug-ins in
Eclipse environment.
Logging in
User needs
to “Log in” before using TC. Currently there is no account management system
implemented.
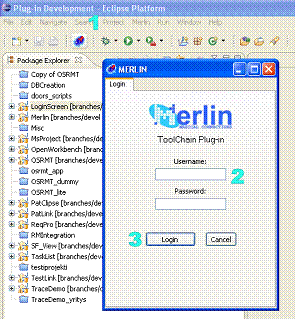
Picture 1: Logging in
- Press ToolChain icon
- Input username and password ONLY
if using PAT, otherwise leave empty.
- Press login
After
logging in, plug-ins for the selected tools will pop up (see installation
manual on how to select the tools). Please note that not all tools have
plug-ins of their own.
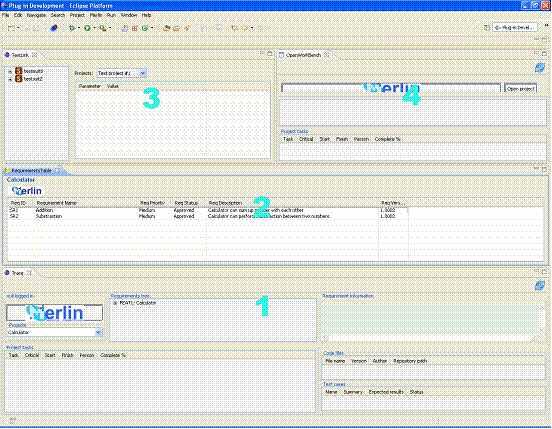
Picture 2: Example
layout for ToolChain
1)
Traceview
2) RequisitePro plug-in 3) Testlink plug-in 4) OpenWorkBench plug-in
Picture 2
shows how the perspective looks after logging in. Your will differ from this,
initially the views will be tabbed to same window, but Eclipse allows you to
drag and drop the view. You can place the views as you wish, but for tracing, which
needs a drag and drop, all the views can not be in the same window as the
Trace-view.
Using the Tracing view
In tracing
view it is possible to create dependencies between different artefacts like
tasks and code files. It is also possible to see these relations.
Creating
links is done by
selecting suitable item from Requirements tree. What is considered suitable
depends on which RM tool is used. The link is then created to the selected
requirement by dragging from another plug-in the wanted artefact to its
designated place. The place depends on the type of the artefact; whether it is
PM, TM or CM artefact. If the artefact if of type PM it must be dragged to
Project tasks table in the Trace view, if it is TM then to Test cases table and
if it is CM the artefact can be dragged to the code files table.
Removing
links can be done
by selecting the requirement from which you want to remove the links from. Then
choose the artefact you want to remove and right click on it and choose
‘Remove’ and confirm ‘Yes’. The link is then removed.
View
link information
can be performed by selecting the wanted requirement or equivalent from
‘Requirements tree’. The information about traced artefacts is then shown.
Currently ToolChain supports only tracing to requirement (or equivalent) and
thus it’s possible to only show information from this point of view. Every
requirement has a prefix in format (x/x/x). This means how many links of types
(PM / TM / CM) the chosen requirement has. Currently the information is updated
to UI only when changing project.
Additional information
about tracing
There are
some differences how to perform tracing depending on the tool. Here those
differences are listed.
Project
Assist Tool
When using
PAT, trace view has a special icon from which a view can be launched that
allows tracing tasks to requirements. This icon which is shaped like a ‘i’ can
be located from upper right corner of the view. Press this icon and drag the
opening view to place of your choice so you can perform tracing by drag &
drop. Only tasks (round ‘T’ icon) can be dragged.
Open
Workbench & Microsoft Project
When using
OWB or Microsoft Project, a project .XML file has to be opened before tracing
can be performed. This can be done by pressing on the ‘Open project’ button and
choosing the .XML file which contains the project. After a while the project
should be opened in the plug-in, and tracing can be performed by dragging icons
indicated by the round ‘T’ to Project tasks in trace view.
Requisite
Pro
When using
RequisitePro as RM tool, tracing can be performed only to those items in tree
that have SR prefix.
DOORS
When using
Telelogic DOORS make sure that you have the DOORS client running before
starting Merlin plug-ins. Tracing can be performed only to items indicated with
‘R’ icon, which resembles a requirement. Yellow R icon means that there are
links in the item.
OSRMT
If using
OSRMT as RM tool, make sure you have placed connection.xml to Eclipse root
directory and configured it properly, as guided by the installation manual.
OSRMT allows linking to all the items except the items at the top level.
Subversion
When using
Subversion, make sure that SVN is configured properly as stated by the
installation manual. Otherwise you might get ‘File not found from repository’
error when trying to perform tracing. If you have a project which is under SVN
version control, you can simply drag the files from package explorer to the
trace view’s Code files section. If the repository can not be reached currently
there might be a moderate delay before linking is performed. Same delay might
be experienced when viewing the requirement with links to repository which can
not be reached.
Softfab
Softfab
plug-in does not support drag and drop, therefore tracing has to be done
differently. Softfab test cases are prefixed with requirement id which you can
get by right clicking on the requirement in trace view and choosing ‘View
prefix’. When prefixed, test cases should appear for the given requirement in
trace view.
Testlink
When using
Testlink, test cases (which are under test suites) can be dragged to ‘Test
cases’.